 For many years while I was a poor student, I would sit in Borders in the woodworking section and read Scott Landis' The Workbench Book: A Craftsman's Guide to Workbenches for Every Type of Woodworking (The Taunton Press, 1987). Over a few years and several continents (I originally came to love Borders in Singapore), I had read almost half of it sitting on the benches or floor of Borders book shops. I now wonder if I could have afforded to pay for that book if I'd used that time to work. However building the benches like the ones shown in this book were considered a dream. Certainly my preference at that time was to buy the occasional quality tool to allow me to build the occasional project and I've always had a mind for long-term investment and the future potential of the tools I bought. Yet I wish I had splurged to buy this book sooner than I did.
I remember one thing that I really liked about this book, when I started reading it over a decade ago, was Scott's historical interest in workbenches. From the first page you are learning and being drawn into Scott's passion. In the first years of my university life, my mind was opened to investigating historical documents and evidence, which was a strange change from my absolute hatred of high school history classes. So when I eventually found and read Scott's book, I was drawn into his methods, observations and assumptions about particular periods of wooden work benches and their transformed off-spring.
my first wooden work benches
Early on in Scott's book, he makes a very preceptive comment about the Dominys' workbenches (made by a family of woodworkers in East Hampton, Long Island, U.S.A.):
While the Dominys may have lingered somewhat behind the latest innovations in the European capitals, it would be a mistake to consider their benches primitive, or somewhat deficient. Like all traditional tools, they were designed to serve the particular needs of the craftsmen who built them." (The Workbench Book, p. 15)
 I can certainly understand these comments. With over three generations of woodworkers in the family, you're going to know the needs of your benches and their suitability for your work.
After I had finished my second degree, I finally had the opportunity to build a few work benches. Since I was busy with travelling and visiting many different groups as part of my job, I only really had a few hours each week to build some benches. The needs were pretty simple: 1. a bench to work on; 2. easily movable; 3. not taking up space in a garage; 4. able to be knocked around; and 5. an easy project to do with Dad. I looked through my collection of woodworking notes and books and found a design for a collapsible worktop bench. I don't think I have the book any more because it probably came from one of those tool shop DIY pamphlets. It was a simple design and easily modified. I wanted to make two of them - one for my father and another for some friends who were letting us live in their basement apartment rent free.
 The construction was very simple. The bench top was two MDF pieces glued together with some trim screwed onto the front. The legs were scrap pine 2x4s which a friend gave me (many thanks Mr McPherson!). We used mortise and tenon joints which I pretty much had to do by hand - I used my father's circular saw to get rid of some of the waste on the tenons, but otherwise it was using saws and chisels. The mortises were hand drilled then chiselled. It was certainly a satisfying result, although I must admit the work was a bit shoddy at times. We used the modern version of small wooden stakes through the joints to secure them further, that is countersunk screws. I have since learnt that Christopher Schwartz calls this 'the lost art of drawboring', but I suppose this depends on who you learn from and what books you read. For example, in David Charlesworth's third book, he shows you how to make a dowelling board to make nice, wooden stakes. So I assume it is a regular practise for him. It makes sense to me and it must have been mentioned in some book for me to have done something like this on my bench.
 The legs and top were attached to another MDF board using brass piano hinges. This backing board could be held against the wall by a strip of wood or it could stand free wherever you cared to move it. Did it suit our needs? Certainly. It was very sturdy. The MDF top was very strong. You had lots of clamping options. It was mobile. They only stand about 10-15cm out from the wall when folded up so they practically take up no space at all.
As you can see, my father got to them with the paint. Certainly the legs needed painting because the 2x4 builders pine didn't complement the top at all. The MDF backing board was also pretty ghastly when it was placed against the painted garage wall. We had also somehow managed to damage the front of the MDF bench top before putting on the trim. So unfortunately, Dad painted the top of one and had starting on the second before I knew what he was up to him. The filler was noticeable so Dad just painted it. It hides the mistakes but if you were to do any fine woodworking on the bench, I suspect you'd get some paint marks on your project. However, at least he now had somewhere to work.
roubo in landis
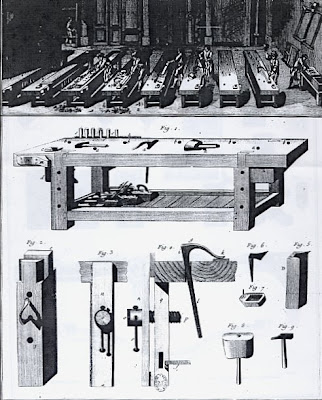
 Now I eventually purchased a copy of Scott’s book and read it again cover to cover. What I particularly enjoyed about Scott's book, was his objective review of particular historical workbenches, tracing some of the developments or how they were adapted throughout Europe and America. Obviously, the bench which caught my attention was the 18th Century Roubo bench. Admittedly, I have fallen in love with almost all the benches in the book at some time or other (even one of those funky shaving horses although I have no idea what I thought I could make on one of them). However the Roubo bench described and demonstrated is still my passion.
As you look at the pictures from Roubo's original monograph, you have to wonder why he employed that particular artist - to my eyes, it seems the artist had the ability to capture the perspective of the professional woodworkers' shed as perfected later by M. C. Escher. I still laugh when I look at those roof beams (unfortunately not shown in the picture at right). Furthermore, I sometimes wondered if Roubo was a very 'height challenged' man - it looks like the bench top comes to the knee height of some of the workmen, plus the benches are so long they look very short. Either Roubo lived with a very sore back from being bent over double or maybe he made more money from writing about wood working rather than doing it himself? Nevertheless, when you look at Rob Tarule's bench, you obviously see you can 'correct' such a possible height discrepancy.
The other attractive features of this bench are the dovetailed leg tenons through the top of the bench. They just look right for this bench, especially when you consider Tarule just uses a slab of wood. In Australia, there are many tough wood varieties which you consider using in this 'slap a huge slab on some legs' designing. So using dovetail tenons would show a little bit of skill in making such a bench. However, I must admit I am more partial to the more 'traditional' (can you say this when considering all the different bench tops in Landis' book?) laminated top.
I find it interesting that Scott doesn't offer a plan of this workbench in the Appendix. Maybe he considers it a 'slab on some legs', so its not worthy of a dimensioned plan. However, this was appealing to me since building this bench would be a unique challenge. It would be relatively easy to take one of the plans in the back of Scott's book, cut some wood, and build the bench. However, without such a guide, fewer woodworkers would attempt such a build (certainly from the ranks of us amateurs at least), so whatever form of the Roubo bench I built, it would be unique. And certainly one day I hope to build it.
khalaf on roubo
 I am unsure know how I stumbled upon Jameel (Khalaf) Abraham's blog, but he has certainly revitalised my interest in the Roubo bench. Jameel was building the 'German version' of the Roubo bench and was doing a fabulous job of it. His attention to clear and informative blogging matches his fine eye and hands for woodworking. I started following the progress of this build from about halfway when he was working on the rolling mechanism for the leg vise. Jameel has done an excellent job and a love the way he continues to develop and refine his bench although he has just completed it!
The German cabinetmaker's bench described by Roubo is not that different from the Roubo bench which Scott Landis mainly speaks about and which Rob Tarule built. Certainly, the only main difference is the use of a sliding leg vise, although some might argue that the tail vise is also a major difference. However it seems to be that the key similarity between the benches is how the legs are flush with the top. These other parts (leg vise, tail vise, bench dogs, holdfasts, etc.) are options which Roubo shows at the bottom of his drawings. I haven't read the original Roubo books, however I wonder if this is how he expected these optional extras to be used. He observed the many configurations of the bench, drew the standard bench, and added a collection of optional extras. I'd be happily corrected in this once the French translation is available for all to read.
What 'optional extras' do I admire about the bench? I suspect I would use both a crochet (hook on the side of the bench) with a full length leg vise. Jameel has made rollers for his leg vise which allows the vise to open and close extremely smoothly. Unfortunately it raises the parallel guide above the shelf and consequently it potentially interferes with items place on the shelf. Consequently, I would build a full length vise which puts the parallel guide below the shelf and out of the way. Another feature I admire about the bench is the bench stop. I enjoy planing and tuning planes, so these would be a helpful device for this task. I have always appreciated having the option to use bench dogs for clamping. The German version in Landis has an enclosed tail vise. I must admit I like the tail vise on Jameel's bench, but it looks a lot more complex to build. Hopefully this style, which Landis describes later as David Powell's Enclosed Tail Vise (often called a wagon vise by some American woodworkers), reduces the tendency of leg vises to distort. As for holdfasts, I am not particularly fussed with them. I have never used a metallic holdfast and I have a collection of good clamps I can use. However, I would see to this type of clamping method later on since the holes for these can be added at any time after the build.
Consequently this is the bench of my dreams.
Or at least it was...
schwarz on roubo
 At this point I have to make a confession. Up until this point I had described my intentions to build a Roubo bench and my enthusiasm has been high. But now I have pretty much fully edited this post after reading Workbenches: From Design and Theory to Construction and Use by Christopher Schwarz. Now I am just disappointed with Roubo and I can't really explain it. Consequently this post will only be posted over 3 months after it was started.
I suppose on the one hand, Chris (I hope he doesn't mind this short hand form of his name) has done me and other Roubo dreamers a service. In this book, Chris describes in great detail the construction of his Roubo bench. It is a extremely helpful book when you consider what features you need in a bench to fulfil its function. Chris' basic thesis is that a bench must allow you to work on any surface of a piece of wood. Its a simple and helpful idea, with a great deal of truth to it. I can see how my first benches described above fail pretty badly in this area. You could only work on lumber with very limited sizes.
However, I do not agree that Chris' thesis is completely true. For example, for my next bench, I certainly want a space where I can construct a boat on. Planing and working on three sides of lumber will certainly not be the primary function of a bench while I am boatbuilding. Rather a strong, solid gluing surface is key. However, this does not mean I won't need to work on three sides of a piece of wood at other times. To simplify the function of the bench to such a simple idea is a little simplistic to me. The variation of workbench types in Scott's book testifies to this fact.
Another helpful section in Chris' book is his recommendations of wood varieties based on wood characteristics. I have been searching the internet to find the official statistics of wood varieties grown around here and I've typed all the info up into a spreadsheet. This will allow me to build a bench with wood which is both cheaper yet suitable for my bench's function. And then Chris describes the dozens of different functions of a bench and the common methods or features to fulfil them. I have sat down with a pencil and paper and selected the ones which appeal to me and my woodworking plans, then considered the numerous options Chris suggests. This alone is worth buying the book for (or reading it in a Borders bookshop near you).
But then, at the end of the day, Chris has put a detailed design and explained plan into the hands of every bench builder. I suppose any bench I build now will no longer be so unique. To add injury to insult, I found out that Chris has a blog which he regularly posts on. I signed up to get these in my email inbox, and surprisingly enough, one of the first ones I received was news about Lie-Nielsen selling these bench. Argh!! And now you do a quick google search and you can find others who have started building the bench based on Schwarz's work (an example).
I don't and can't blame Christopher Schwarz for these disappointments. Yea, he seems more like a journalist than an experienced woodworker/cabinet-maker to me. He has great advice, but it never seems to me that he has learnt it from an apprenticeship or from costly mistakes a cabinet-maker would regret when trying to sell his work. And I must admit I feel that certain American-ness whenever I read something he writes. It isn't that over-powerful arrogance you meet while, say, trying to have a quiet lunch with your family in Venice but you get disturbed by your neighbours who have so many stories to tell you, that you don't get a minute to think. I think as a journalist and editor, Chris is trying to sell his magazine and consequently I 'hear' this whenever I read his stuff.
Do I say all this, critiquing his work, while disappointed? Most likely. I am thankful for what he has done in writing his book, yet disappointed he has made it too easy for all of us. Call it 'fuming admiration' if you like. At the end of the day, he's got a lot of good advise which I should be wise to listen to.
my roubo
So where does this leave me? Well in the back of my mind, I am planning to buy some locally grown ash soon to start drying in preparation for a Schwarz version on Roubo workbench. I will put in a sliding deadman (should I mention here I can't understand Chris' call to originality while he also adapts this bench to his needs with things like a deadman?), front vise, and a wagon vise. I have a list of particular features I'd like to use, but I will only finalise these once I get the wood.
I am still passionate for Roubo. I am also thankful to those who have gone before and will help me realise this dream.. that is if I can get my act together and build it.


